How to Setup Facebook App ID to Update Status Via Your Name, Website Url or Blog e.t.c
Did you notice when some people or owner of pages leave a status on Facebook, they have their own custom ‘posted via..’ display together at the bottom of the status. This custom status usually will show where the status was posted from and seems to be fixed according to the device they log the status in.
For example, when you update your Facebook Status from your Blackberry, Android or even from your mobile web browser, and you will see the device name reflected on your status, like ‘posted via Blackberry’ and so on. Let’s take this up a notch and get our statuses posted ‘via our name’ or ‘via our website url’, shall we? All it takes is a little trick.
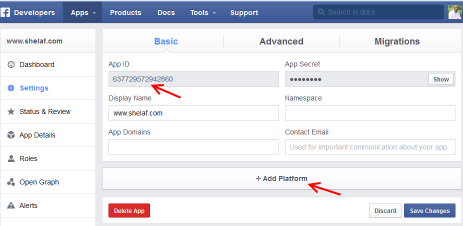
Take note of the App ID. You can write it down or save it somewhere you can easily access.
A confirmation window will pop up. Click on the "Confirm" button.
It is simple as that.
You can click on "App details" to add description, icons, banners, contact info and demo video.
You can see all your Facebook apps at :https://developers.facebook.com/apps/ You can click on any app on the page to see the app's ID.
you have just created.
2. Copy and paste in your browser address bar. Hit the "Enter" or "OK" button.
You should see something like this:
3. Type whatever you want to post to Facebook and click "Share".
That is all.
In the Facebook News Feed, it will appear like the screenshot below:
On your Facebook Timeline, it will appear like this:
For example, when you update your Facebook Status from your Blackberry, Android or even from your mobile web browser, and you will see the device name reflected on your status, like ‘posted via Blackberry’ and so on. Let’s take this up a notch and get our statuses posted ‘via our name’ or ‘via our website url’, shall we? All it takes is a little trick.
To Set Up Facebook Application
- Go to: Facebook Developers Setup Page
- Click on the "Create New App" button
- Enter your blog/site url in the "Display Name" field
- Leave "NameSpace" blank
- From the "Category" drop down menu, select a category for your blog site e.g Entertainment
- Click the "Create App" button
Take note of the App ID. You can write it down or save it somewhere you can easily access.
- Click on "Settings" > "+Add Platform"
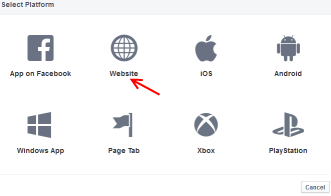
- Select "Website" from the options. This will open up a new field as seen below:
- Enter the URL of your blog/site in the "Site URL" and "Mobile Site URL" fields as seen above.
- Click the "Save Changes" button
- Scroll up and enter your domain name in the "App Domains" field
- Enter your email address in the "Contact Email" field.
- Click the "Save Changes" button.
- Click on "Status & Review"
- Click on the blank tab besides "NO" to change it to "Yes"
A confirmation window will pop up. Click on the "Confirm" button.
It is simple as that.
You can click on "App details" to add description, icons, banners, contact info and demo video.
You can see all your Facebook apps at :https://developers.facebook.com/apps/ You can click on any app on the page to see the app's ID.
How to Post Custom Status to Facebook
You have now created your own Facebook App! Now let’s move on to posting with your new via status.https://www.facebook.com/dialog/feed?app_id=637729572942860&display=page&redirect_uri=http://www.facebook.com 2. Copy and paste in your browser address bar. Hit the "Enter" or "OK" button.
You should see something like this:
3. Type whatever you want to post to Facebook and click "Share".
That is all.
In the Facebook News Feed, it will appear like the screenshot below:
Conclusion
It is not so hard to create a custom status, and you can even share the URL with your friends and fans on Facebook, website or even on your own blog. The more people using and liking it, the better as you will be getting free directed traffic from your via status. Remember to Bookmark the Feed Dialog URL so you won't have to be typing it every time.
How to Setup Facebook App ID to Update Status Via Your Name, Website Url or Blog e.t.c
 Reviewed by blogger
on
September 05, 2016
Rating:
 Reviewed by blogger
on
September 05, 2016
Rating:


No comments